Grading Mercedes AMG A35
“For this commercial using the dual ISO on the BMPCC 6K and being able to hold so much dynamic range and detail in Blackmagic RAW, helped us to do the impossible. That was to shoot a car commercial at night, with a very small crew and no crane or car-rigs whatsoever!”
“All we had to shoot this project, was the BMPCC 6K and the DJI Mavic Pro drone, and so it was critically important to be able to match the footage in post production. With the BMPCC 6K, we shot in Blackmagic RAW at 5 to 1 compression in 6K, and the DJI Mavic, we shot in 4K MP4.”
“I guess the biggest problem with this shoot is that we were in very low light on the streets of Frankfurt in Germany, so we were unable to use any controlled lighting. And, so we had to use some techniques in post production that I don’t normally do. We also had an agency that didn’t want the film to be too dark as this film was being used on the Mercedes YouTube channel, so a very balanced and natural grading was very important to them.”
“The whole project was post produced in the Blackmagic ecosystem. It was edited, color graded and mastered all in Resolve. I used my MacBook Pro 16” to do the color grade and T2 Films in Italy did the editorial. The biggest challenge were the tail lights and the color of the car. I wanted to get this as close as I could in camera to miminize time in post production. The client wanted the car color to be exact of course, so we tried hard to keep it neutral. I wanted to initially push the contrast and give it a cooler look, but we ended up just going with a neutral look.”
“We found that shooting in BRAW and having that power of Resolve was a huge advantage. When we were shooting in the streets at night, we found that all the street lights were kind of a yellowish green color. So I was able to adjust this by using a simple curve. We were able to completely change the color of the lights which was crazy, you can only really do this with these types of files.”
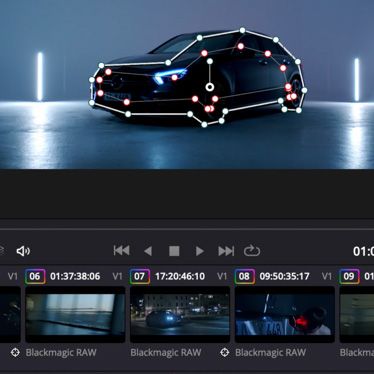
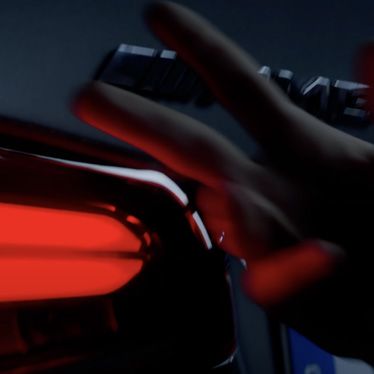
“We had to do this with every single car shot as it had this same yellowish green color. The other thing that we had to do was to make sure that all the detail was still in the car lights, so there was a lot of masking and tracking of the car lights. We basically just masked the eye of the headlight and tracked that to allow us to bring down the brightness and keep the detail.”
“The opening shot used the Mavic Pro drone, as this was in very low light there was a lot of noise, because it doesn’t shoot in RAW and the sensor is very small. I didn’t have as much latitude with the grade of the drone footage as we did with the BRAW, so I had to work a little bit harder to give it the look you see in the final film. Using 3 nodes I basically did a simple white balance, contrast, color balance on the 1st node, on the 2nd node I used the Buttery REC 709 LUT and just dropped the temperature a bit as I wanted to give a cooler look, and adjusted the gamma and gain. On the 3rd node I introduced a little bit of noise reduction, not too crazy, as I didn’t want to degrade the image and I also added a little bit of sharpness. When you look at the original image it looks completely different, so I am really happy with what we could achieve with the drone footage in Resolve.”
“As I mentioned, the biggest problem we had was with the street lighting where we had no control of the yellow lights. With all the car shots being shot on the BMPCC 6K, it made grading very easy. Because of that yellowish green caste to the lights, I had to make sure I got rid of that, so I used the Hue vs Sat Curve and I basically color picked the yellow light and then completely desaturated it using the curves. After I did that, the image looked really natural and it just cleaned it up nicely. So, nothing too crazy but it really helped the look of the image and got rid of that yellowish green color for sure.”
“There were a few shots that we shot on the BMPCC 6K on a gimbal outside the window of the car. With these shots, I did a little bit of stabilisation as it was a little shaky, but other that that we just added the Buttery REC 709 LUT and did the other basic adjustments. Whenever I shoot, I try to capture the image as I really want it. I never think that I will capture it and fix in post. All I ever want to do in post is add a LUT, convert to REC 709 and do just the basic adjustments. For me this is a big deal, as it saves you so much time and money in the post production process.”
“With the shots in the studio, I had to find some compromise because of the look the agency were going for and the colors they wanted to see with the car. So I had to use more nodes to mask out various parts of the car to basically balance the colours and light up the car. With one of the nodes I masked out the car and inverted the mask to bring down the exposure of the background, just to make the car pop out better against the background.”
“The trickiest shot of the whole film was when the car is on the bridge. There really was not much light, and so we had the camera at 3200 ISO. When you are at this ISO it is really difficult to give the car a nice contrast look without making the car look very dark. So I used a 7 node set up on this shot; 1st node as usual being the basic adjustments, however I added a little bit of noise reduction as well. There was a street light in the background that had the ugly yellowish color, so I graded that out and made that more grey. I also masked the headlights to get back the detail and then added one last mask to add light into the foreground.”
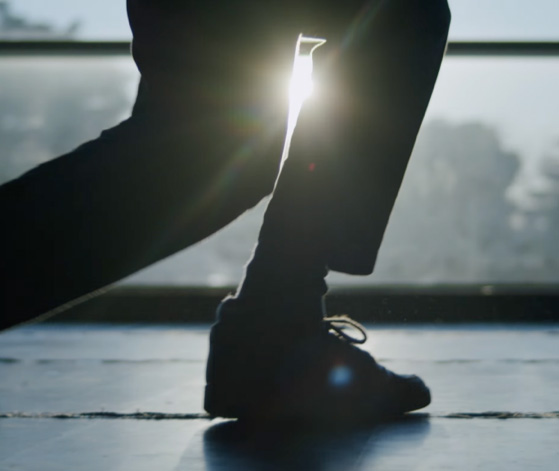
“We also shot the male actor in the dance school at sunrise. It was a very basic setup on this one, just 2 nodes with the basic adjustments and the Buttery REC 709 LUT applied. We kept the blue color on this to link it through the whole commercial. One of the shots was a little bit before sunrise. I intentionally shot it a little bit under exposed as this is how I wanted the shot to be. I still used that basic 2 node setup with the basic adjustments and the REC 709 LUT.”
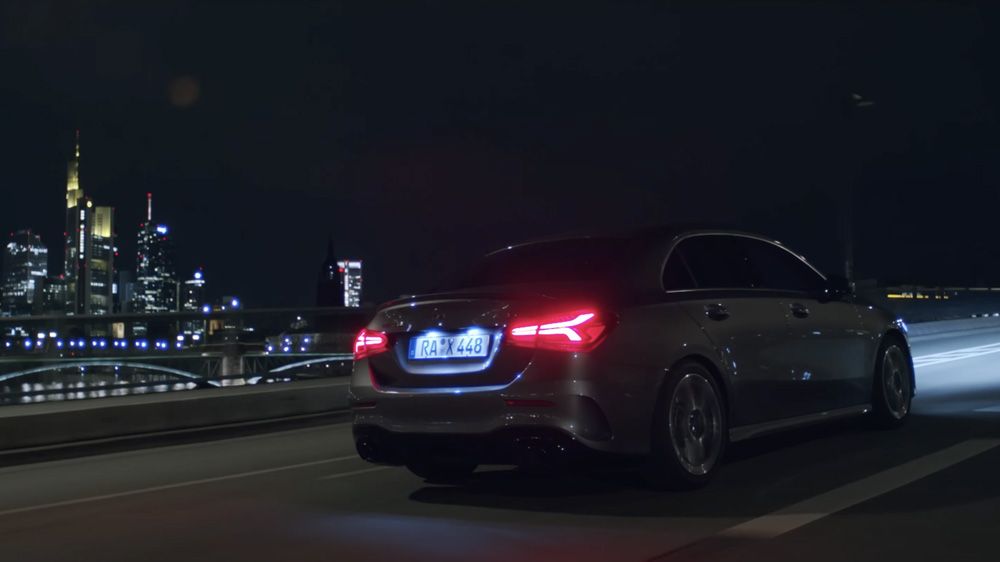
“The car shot on the carpark rooftop, which showed the city in the background, was a cool location. For this the only thing I added on top of the usual 2 node setup was that I put a mask on the car to bring up the exposure and pop the car out a bit. The other shot where the car is driving toward us with the headlight on, and the crazy lens flare, was again very simple. I used the 2 node setup and also added the Hue vs Sat to again pull out the yellowish color.”
“The other pretty tricky shot in the film, was when the car is going through the tunnel. Again the shot was very yellow and green, so I masked the car and tracked it and then used the Hue vs Sat to grade out the yellow and green. The other important correction with this shot was the license plate correction. I hated the blue caste that was on there, so I masked it, tracked it and then used the Hue vs Sat to pick out the blue and desaturate it.”
“The whole grade took me many days to complete, as I needed to keep going back to rewatch it all, just to make sure that it all matched and also because we had so many shots, even if the video was short. Although a lot of the node setups are the same, it is important to make sure that all shots matched and the colors were the same throughout the commercial. To see how I shot this commercial, you can see the BTS and read about the setup at https://www.splicecommunity.com/projects/mercedes-amg-a35”